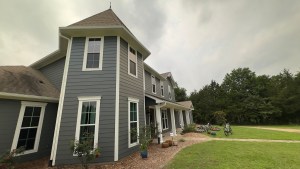
Run your hand along the painted siding of almost any home in Tyler, Lindale, Whitehouse, or Bullard that hasn’t been repainted in the last several years, and there’s a good chance your palm comes away with a faint powdery residue that matches the color of the siding. That powder is not dirt, it is not mildew, and wiping it away doesn’t fix it. What you’re feeling is chalking — the visible sign that your exterior paint system has reached the end of its protective life and the binder holding it together is breaking down at the surface.
Chalking is one of the most common exterior paint conditions on East Texas homes, and it is also one of the most misunderstood. Homeowners typically discover it when they lean against the siding and transfer color onto their clothing, or when they notice that rain seems to leave streaks of lighter color running down from painted surfaces onto trim or masonry below. Some assume it’s a cleaning problem. Others assume they can simply paint over it the way they’d paint over any other weathered surface. Both assumptions lead to the same outcome: new paint that peels within a season or two because it was applied over a surface that could not support adhesion.
Understanding what chalking actually is, how to assess how serious it is, and what preparation is genuinely required before painting over it is what separates a repaint that lasts eight years from one that fails before the warranty period ends.
Why Exterior Paint Chalks
Exterior paint is a system of three primary components: pigment particles that provide color, binder resin that holds those particles together and adheres the film to the substrate, and additives that control application and performance properties. When paint cures on a surface, the binder forms a matrix that encapsulates the pigment and creates the continuous film you see and touch. Over time, ultraviolet radiation from the sun attacks that binder matrix and breaks down its chemical bonds — a process called photodegradation.
As the binder degrades at the surface layer of the paint film, it loses its ability to hold pigment particles in place. Those particles become unbound from the surrounding matrix and accumulate at the surface as a loose, powdery deposit — the chalk that comes off on your hand. The process is essentially the binder sacrificing itself at the surface to protect the layers below, which is why chalking in moderate amounts is considered a normal aging mechanism rather than a catastrophic failure.
In East Texas, the chalking process happens faster than in almost any other region of the country. Smith County and the surrounding areas receive intense UV radiation across a long, hot summer with relatively few cloudy days providing relief from direct sun exposure. Surface temperatures on south and west-facing walls in Tyler regularly exceed 160 degrees Fahrenheit during peak summer hours — temperatures that accelerate binder degradation at a rate that shortens expected paint service life by thirty to fifty percent compared to manufacturer testing conducted under moderate conditions. A paint system rated for ten years in New England may chalk to an unacceptable degree within five or six years on a Tyler home simply because the UV stress load is so much higher here.
How to Test Whether Your Chalking Is Light, Moderate, or Severe
Not all chalking requires the same response, and assessing severity before committing to a preparation approach saves both time and money. The simplest field test for chalking severity is the rag test: take a dark-colored cloth or your hand and rub it firmly across the painted surface in a consistent stroke. The amount of powdery residue that transfers tells you where you are in the chalking spectrum.
Light chalking leaves a faint residue that barely colors the cloth. This represents normal end-of-life weathering and indicates that the binder has degraded primarily at the outermost surface while the paint film below remains reasonably intact. With proper cleaning and preparation, new paint can bond to this surface.
Moderate chalking leaves a clear, distinct powdery deposit that coats the cloth or palm noticeably. The binder degradation has progressed deeper into the paint film, and the surface layer has lost significant cohesive strength. This condition requires more thorough cleaning and preparation before new paint can adhere reliably.
Heavy chalking leaves a thick, almost paste-like residue that transfers heavily and may include chunks of loosening paint film along with the powder. At this severity, the existing paint film has essentially lost structural integrity at the surface, and in some cases the chalk layer is thick enough that it acts as a release layer between the substrate and any new paint applied over it — the same way a powdered surface releases a mold rather than bonding to it. Heavy chalking typically indicates that the previous paint system was either of poor quality, was applied over inadequate preparation, or has exceeded its service life significantly enough that the full film needs to be removed rather than painted over.
Why Painting Over Unsupported Chalk Always Fails
The mechanism by which chalking causes new paint to fail is straightforward but important to understand, because it explains why the preparation steps described below are not optional shortcuts that can be skipped in the interest of speed or cost.
When new paint is applied directly over a chalked surface without adequate cleaning, the fresh paint bonds to the loose chalk layer at the surface rather than to the sound paint film or substrate below it. The chalk layer has no cohesive strength — it is, by definition, a collection of unbound particles sitting on the surface. New paint bonded to this layer has exactly as much adhesion as the chalk has to the surface below it, which is essentially none. Within one season of thermal cycling, moisture exposure, and the normal stress that East Texas weather imposes on exterior surfaces, that chalk layer releases from the substrate and takes the new paint with it in sheets or patches. The result looks like a paint failure, and technically it is — but the failure was built in at the preparation stage, not the application stage.
This is the most common source of premature exterior paint failure on repainted Tyler and Lindale homes: a professional or DIY painter who pressure washed the surface but didn’t adequately address the chalk layer, applied quality paint over what seemed like a clean, dry surface, and watched it peel off the following spring. The chalk was still there under the pressure wash — lighter, partially removed, but not gone — and the new paint bonded to it rather than to the actual substrate.
The Correct Preparation Sequence for a Chalked Surface
Preparing a chalked exterior surface for repainting in East Texas requires a specific sequence of steps that address both the chalk removal and the surface conditioning that allows new paint to bond properly.
The first step is pressure washing at appropriate pressure for the siding material — typically between 1,500 and 2,500 PSI for painted wood or fiber cement siding, with a wide fan tip that cleans without gouging the substrate. Pressure washing removes a significant portion of the loose chalk but rarely removes it completely, particularly in textured or rough-surface materials where chalk accumulates in the surface profile. After pressure washing and complete drying — which in East Texas summer conditions typically means twenty-four to forty-eight hours of dry weather, not just until the surface looks dry — the chalk test should be repeated. If significant residue still transfers from the surface after washing, additional cleaning is needed.
For moderate to heavy chalking, a dedicated chalk-removing solution or a mild detergent scrub using a stiff-bristled brush on the siding surface after pressure washing removes the residual chalk that pressure alone couldn’t dislodge. This step is particularly important at the horizontal shadow lines on lap siding, where chalk accumulates in the recesses between overlapping boards and pressure washing at standard technique cannot reach adequately.
After cleaning and drying, a primer specifically formulated for chalked surfaces — sometimes labeled as a chalk-sealing primer or a high-adhesion exterior primer — applied before topcoats creates a chemical bond that penetrates through any residual chalk and anchors to the substrate below. Standard exterior primers can perform adequately over lightly chalked surfaces, but on moderate to heavy chalking, a dedicated chalk-sealing formulation provides insurance against the adhesion failure that a standard primer cannot fully prevent. In East Texas’s climate, where the next repaint cycle may be five to seven years away, spending the additional cost on the right primer is the decision that determines whether that interval holds.
What to Do When Chalking Has Run Down onto Trim, Brick, or Concrete
One of the most visually obvious signs of significant chalking on East Texas homes is the chalk staining that washes down onto adjacent surfaces — white or light-colored siding chalk running down brick foundations, accumulating as tide marks on painted trim below, or leaving pale streaks across concrete driveways and walkways. These secondary deposits are not merely cosmetic; they indicate that the chalking has been active long enough to produce runoff during rain events, which typically points to moderate or heavy severity on the siding above.
Chalk deposits on brick, concrete, and masonry surfaces need to be cleaned before any painting work begins on those surfaces, because dried chalk residue on masonry is slightly alkaline and can interfere with primer adhesion on those substrates. A mild acid wash — diluted white vinegar or a purpose-formulated masonry cleaner — neutralizes the alkalinity and removes the residue. Chalk deposits on adjacent painted trim surfaces should be removed with a damp scrub before those surfaces are repainted, since the residue behaves the same way on painted trim as it does on siding: new paint bonded to chalk residue rather than to the trim surface beneath it will fail on the same timeline.
Let Quality Coats Handle the Diagnosis and the Fix
Chalking is one of those exterior paint conditions where the visible problem is only the surface expression of what’s actually going on in the paint film, and where the preparation required before repainting is more specific and more consequential than it appears from the driveway. At Quality Coats Painting, we evaluate chalking severity, assess preparation requirements honestly, and apply the right cleaning, priming, and coating sequence to give your Tyler, Lindale, Whitehouse, or Bullard home’s exterior a finish that bonds to actual substrate rather than to a layer of degraded binder that’s already given up. If you’re seeing chalk on your siding, or if you’ve had a recent repaint start peeling sooner than it should have, we’d welcome the chance to give you a straight assessment of what your exterior actually needs. Contact our team today for your free estimate and let’s get your exterior protected the right way.